Imagine stepping into a space that resonates with your unique style, reflecting your personality and vision. We’re sure you’ve explored countless design options and sifted through a multitude of tiles. And finally! You’ve found the perfect tiles!
But now comes the boring (but important!) bit; measuring for your chosen tiles, so you can calculate how many tiles you will need per square metre. Whether you’re a seasoned DIY enthusiast or a beginner embarking on your first home improvement project, getting the tile measurements right is crucial for achieving a stunning and professional result.
Thanks to our step-by-step guide, you won’t need a tile calculator to figure out how to work out square metres for your tiles. Prepare to transform your space as we empower you with the knowledge to measure twice and tile once!
Table of contents
- What tools do I need to measure for tiles?
- How to measure a floor for tiles
- How to measure a wall for tiles
- How to measure a window for tiles
- How do I calculate how many tiles I need?
- What size tile spacers do I need?
- Final thoughts
What tools do I need?
Before you start on your tiling adventure, it is essential to equip yourself with the right tools. Not only will they simplify the measuring process, but they will also contribute to the overall accuracy and success of your project. Here’s a rundown of the tools you’ll need!
- Tape measure
- Pencil and paper
- Spirit level
- Calculator
- A helping hand (just in case)
How to measure a floor for tiles
Measuring a floor accurately is the foundation of a successful tiling project. Whether you want to know how to measure for tiles in your kitchen or you’re measuring your bathroom for tiles or any room for that matter, these steps will guide you through the process to ensure a seamless transformation.
Step One: Gather your tools
Make sure you have all the necessary tools close to hand. (Think Avengers Assemble)
Step Two: Clear the area
Remove any furniture, rugs or obstacles from the area you plan to tile. This will give you a clear and unobstructed view of the floor.
Step Three: Break it down
Divide the floor area into smaller sections, especially if the room has irregular shapes or features, like nooks and alcoves. This will make the measuring process more manageable. If your floor is particularly complex, roughly sketch out the shape from a bird’s eye view, so you can visualise your room in manageable chunks.
Step Four: Measure the length and width
Starting with one section, use your tape measure to determine the length and width of the space, using metric measurements. Measure from wall to wall for optimal accuracy.
Step Five: Account for obstacles
If there are any permanent fixtures in the area, like cabinets or pillars, measure the distance from the fixture to the nearest wall. This will help you accurately cut tiles to fit around these obstructions.
Step Six: Calculate the area.
Working out the total square metres required in each section can be calculated by multiplying the length by the width. Your tape measure will typically be in centimetres, so you will then need to divide the total by 10,000 to convert your floor measurement from cm² into m².
Step Seven: Repeat for other sections.
If your room has multiple sections, repeat steps three to six for each. Add up the individual section measurements to determine the total amount of tiles you’ll need for the entire room.

Before making any purchases, double-check your measurements and calculations. It’s better to catch any errors now than after you’ve already started tiling! Plus, you’ll avoid getting caught out by extra delivery charges.
How to measure a wall for tiles
When tiling a wall, it follows a similar logic to measuring a floor but with a focus on vertical dimensions and potential obstacles. Whether you’re creating a tile statement wall for your kitchen, revamping your bathroom or adding a splash of colour to your living room, here’s your step-by-step guide!
Step One: Gather your tools
As with measuring a floor, ensure you have your trusty tape measure and all other relevant tools nearby.
Step Two: Prepare the wall
Clear the wall area of artwork, shelves, or any fixtures that could hinder your measurements. This clean canvas will ensure precise results.
Step Three: Identify the area
Determine the specific section of the wall you plan to tile. It could be an entire wall, a splashback above a counter, or a decorative accent section.
Step Four: Measure the width and height
Starting from one corner of the area, measure the width horizontally and the height vertically. For optimum accuracy, make sure your tape measure is as flush as possible against the surface.
Step Five: Note obstacles
If your wall has outlets, switches, or other features, measure their height and width from the edge of the area. Make a note of your calculations, multiplying the width by the height. This will guide you in making precise cuts to accommodate these.
Step Six: Calculate the area
Multiply the width by the height to establish the total square metres of wall area you’re tiling. Then, deduct the square metre coverage of obstructions on the measured wall, such as windows or doors. Don’t forget to convert your calculations from cm² into m².
Before finalising your measurements, ensure they’re accurate. It’s far better to catch any errors now than during installation. For walls with intricate angles, curves or unconventional features, seeking professional advice or employing specialised tools, like a digital angle finder, can be immensely helpful.
How to measure a window for tiles
Tiling around your window can enhance the visual impact of a room. Whether it’s your en-suite, conservatory or even your home study, your tiles will create a stunning frame for your window and a seamless transition to the architectural elements. Here’s what you need to do!
Step One: Gather your tools
Have your tools on hand, so you’re ready for your next tiling task!
Step Two: Clear the area
Remove curtains or blinds to access the window area easily.
Step Three: Identify the space
Decide where you want to tile around the window – just the immediate perimeter or a broader frame.
Step Four: Account for window fixtures
If there’s a sill or any fixtures, measure their dimensions and distance from the tiling area.
Step Five: Calculate the area
Multiply the width by the height to find the total square metres. Remember to divide the calculations by 10,000 to convert your measurement from cm² to m².
Step Six: Locate the centre of the window
Find the midpoint of the window by measuring and marking the exact centre. This will serve as a reference point for your tiling layout to ensure a symmetrical finish.
Step Seven: Double-check the measurements
Review your measurements for accuracy. Catching mistakes now prevents problems later.
By following these steps, you’ll ensure your window tiling project aligns seamlessly with the overall design, adding both functionality and aesthetic charm.
How do I calculate how many tiles I need?
Once you’ve measured your room, we’re sure you’ll want to know how many tiles you’ll need to purchase. Depending on the design you have in mind, consider how you want to lay the tiles. The orientation of the tiles can impact the number of cuts needed and the overall aesthetic, whether they’re horizontal, vertical or in a pattern. If you want to lay your tiles along a border, you will need to measure the linear coverage, which will be the horizontal length of your area.
Keep in mind that you’ll need to leave space between the tiles for grout lines. For uniform spacing and a professional finish, you can use tiles spacers. Check the size of the tiles you plan to use. If the tiles are larger or smaller than standard, adjust your measurements accordingly to accommodate their dimensions.
You can calculate the specific coverage of your chosen tiles by multiplying the width and length, then dividing by 10,000 if the measurements are in centimetres or 100,000 if they’re in millimetres. Then, divide the area of your room measurement by the square metre of a single tile. This will indicate the number of tiles that will cover the entire area.
It’s a good practice to add around 10% to your total tile quantity to account for wastage, mistakes and future repairs. This ensures you have enough tiles to complete your project without running short and catching you off guard. You can determine 10% by multiplying your total by 0.1. This will establish how many extra tiles you need to add to the total.
What size tile spacers do I need?
Tile spacers are small but mighty tools that play a vital role in achieving a professional and polished tiling finish. They help maintain consistent spacing between tiles, ensuring even grout lines and a harmonious appearance. The size of tile spacers you need depends on your desired look and the type of tiles you’re using.
Tile spacers come in various sizes, with 1.5mm up to 6mm being the most common. These sizes determine the width of the grout lines between your tiles. The type of tiles you’re using can influence your spacer choice. Smaller tiles, like mosaics or subway tiles, often look best with narrower grout lines, while larger tiles can accommodate wider lines.
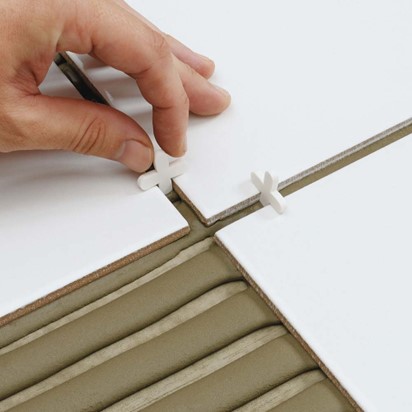
If your tiles have slight size variations at their edges, such as handmade tiles, a slightly wider spacer of 3-5mm can help accommodate these irregularities. Floor tiles typically need slightly wider grout lines to account for potential movement, so are suited to 2-3mm floor spacers. Wall tiles can have narrower lines for a clean finish, so are ideal for 2mm spacers. Conversely, rectified tiles feature incredibly smooth and straight edges. Therefore, even on floor installations, small tile spacers of 1-2mm can be used.
You can also check to see if the tile manufacturer provides recommendations for spacers sizes based on their specific tiles. At the end of the day, the size of tile spacers you choose is a creative decision that influences the overall aesthetic of your tiling project.
Final thoughts
The process of measuring your space for tiles goes beyond numbers; it’s about translating your design vision into reality. Armed with the right tools and a systematic approach, you can confidently measure floors, walls and windows, considering every angle and obstacle. Calculating tile quantities involves envisioning patterns and leaving room for errors, ensuring a seamless installation. Your choice of tile spacers will add an artistic dimension, influencing grout lines and overall aesthetics.
Remember, precision is key, and a meticulous approach will yield a polished result that reflects careful planning. So, you can embark on your tiling journey, knowing that each measurement contributes to a space that’s uniquely yours.
If you’re ready for the next stage in your project, check out Preparing an uneven surface for tiling, How to tile a floor and How to tile a wall.

Was this guide useful?
Mentioned in this project guide:


